I started out in photography doing landscape and nature photography. There was just something great about getting out and recording the beauty of nature and its wonders. On a trip recently to San Diego, I was able to get this shot. It took some creativity and thought since I had limited gear with me. Come with me on a journey to see how I got this image!
Check out the details after the break...
Creative Process:
I wanted to capture the beauty that I was seeing. I knew that the dynamic range of the scene was way too much for film or digital sensor to capture.
There are ways of handling this like:
Using a graduated neutral density filter(ruled out - I didn't have one with me)
HDR processing(ruled out - not that you need it, but I didn't have a tripod and manually stitching hand held shots together can be an issue)
Heavy processing of the negative or RAW file - my choice :-)
Location:
Cabrillo National Park, San Diego, CA
Gear:
Nikon D50
Tamron 28-200mm f/3.8-5.6
EXIF Info:
Shot in Aperture Priority at 1/2000 - f/5.6 - ISO 200 @ 28mm
Shot in RAW
Lighting Setup:
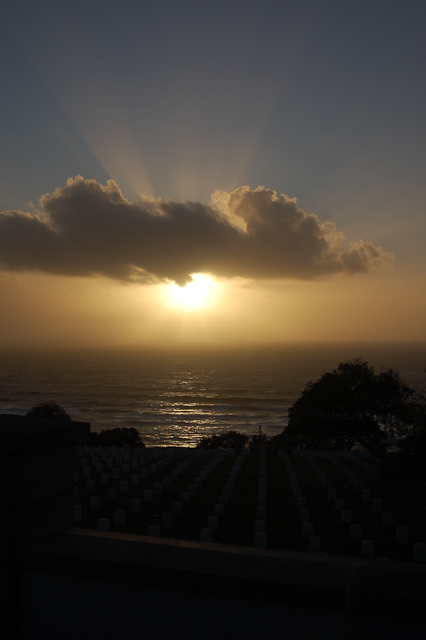
Light from the sun coming right at us. I used the clouds to provide a temporary blind to the direct sunlight, not to mention it gave us some pretty cool "god rays".
Original Image Straight From Camera:
As you can see the sun is dominant, and the foreground elements are very dark. As it is, this shot is pretty bad. However, we shot originally in RAW, so we have a wider dynamic range to deal with and a lot more data(16-bit versus 8 bit - JPG). This provided us some leverage to do some magic in post processing.
Post Processing:
First I setup the levels to a pretty close baseline. From there we need to come to the realization that the dark part of the image is probably 2 or more stops of light darker than the sunlit part. What does this mean? Noise - and lots of it in the shadow areas.
In Photoshop, I went and used the shadows/highlights adjustment to bring up the area of the tombstones and tone down some of the
hot areas in the top part of the image. Even with that, we can only go so far without damaging the pixels beyond recognition.
So, now we start working with the dodge tool in Photoshop to bring up some additional dark areas. Most notably the cemetery wall and selected sections of the cemetery itself.
So, now we need to deal with the noise. for this, I turned to my trusty Topaz Suite of tools - Denoise. I had to go in and find a balance of cleaning up the noise and still keeping the details, which I think came across pretty successfully.

And there you have it. Photographic technique, post processing, and one cool picture of a sunset over a cemetery. Always remember that the more you learn about photography, the more options you'll give yourself. That way, if you travel with limited gear, forget something, have equipment failure, you still can figure out a way to capture great images.
Check out the details after the break...
Creative Process:
I wanted to capture the beauty that I was seeing. I knew that the dynamic range of the scene was way too much for film or digital sensor to capture.
There are ways of handling this like:
Using a graduated neutral density filter(ruled out - I didn't have one with me)
HDR processing(ruled out - not that you need it, but I didn't have a tripod and manually stitching hand held shots together can be an issue)
Heavy processing of the negative or RAW file - my choice :-)
Location:
Cabrillo National Park, San Diego, CA
Gear:
Nikon D50
Tamron 28-200mm f/3.8-5.6
EXIF Info:
Shot in Aperture Priority at 1/2000 - f/5.6 - ISO 200 @ 28mm
Shot in RAW
Lighting Setup:
Light from the sun coming right at us. I used the clouds to provide a temporary blind to the direct sunlight, not to mention it gave us some pretty cool "god rays".

Original Image Straight From Camera:
Post Processing:
First I setup the levels to a pretty close baseline. From there we need to come to the realization that the dark part of the image is probably 2 or more stops of light darker than the sunlit part. What does this mean? Noise - and lots of it in the shadow areas.
In Photoshop, I went and used the shadows/highlights adjustment to bring up the area of the tombstones and tone down some of the
hot areas in the top part of the image. Even with that, we can only go so far without damaging the pixels beyond recognition.
So, now we start working with the dodge tool in Photoshop to bring up some additional dark areas. Most notably the cemetery wall and selected sections of the cemetery itself.
So, now we need to deal with the noise. for this, I turned to my trusty Topaz Suite of tools - Denoise. I had to go in and find a balance of cleaning up the noise and still keeping the details, which I think came across pretty successfully.

And there you have it. Photographic technique, post processing, and one cool picture of a sunset over a cemetery. Always remember that the more you learn about photography, the more options you'll give yourself. That way, if you travel with limited gear, forget something, have equipment failure, you still can figure out a way to capture great images.
No comments:
Post a Comment
Note: Only a member of this blog may post a comment.