Showing posts with label Getting The Shot. Show all posts

Tuesday, December 1, 2015

How I Got The Shot #39 - Dragging the Shutter at the Mother/Son Halloween Dance

This is a companion piece to the previous, How I Got The Shot #38.


In that article, we covered the technique of dragging the shutter and using flash.  If you are unfamiliar with this concept, you might want to read that first, then come back here to follow up on the new stuff.

So what is the new stuff?  Well, we added a small "twist" to the formula we used in the previous dance.

We still are going to use slow shutter speeds in conjunction with flash, but the "twist" is actually literal.


These images above are your "standard" shots.  Fill flash used, as you would have expected.

Since we had been in this venue before, we already knew how to get to a place like in article #38.  However, this felt like it needed something additional.  Being it is a Halloween dance, we wanted to give it a different look.

The shutter speed was lengthened more from the previous times, usually running around 1/5 to 1/15 of a second.  What we did was setup the camera in manual and shot ISO 800, 1/5-1/15s, f/4.  The SB-600 was used in manual and power was set to 1/4 or 1/8 power depending on where were were in the room.  The flash was bounced almost directly upward, and no more than 45 degrees.


You compose your shot, trip the shutter and then immediately after, you twist the camera 90 degrees on it's axis.  This makes the ambient lighting streak in a circular motion around the subject.  The flash freezes the subject, so they are relatively sharp in comparison.

This is the result!  The 2 images directly above as well as the opening image.

Gear used:
Nikon D300
Nikon 24mm f/2.8
Nikon SB-600

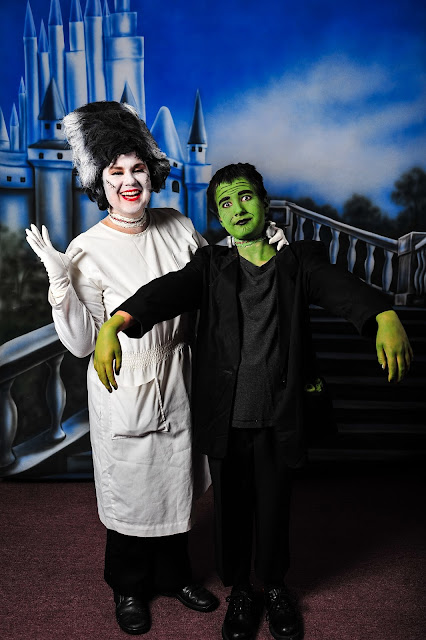
And as with all the events like this, there are some portraits taken.


Gear used:
Nikon D700
Nikon 28-85/3.5-4.5
Radio Popper JRx
AB400 x 2
Flash1 was to camera left at 1/4 power (key)
Flash2 was to camera right at 1/16 power (fill)
Background was not illuminated on its own

Camera settings 1/250, ISO 200, f/5.6

Wednesday, February 11, 2015

How I Got The Shot #38 - Dragging The Shutter At The Father/Daughter Dance

I was hired to get portraits at a father/daughter dance for the Reynoldsburg Parks and Recreation department.

While there, I also agreed to get some grab shots in between formal shots.  I had my Nikon Df tied up with the portraits, so I broke out the Olympus OMD EM1 with the Olympus 25/1.8 prime lens.

As you can imagine, a dance setting has lots of darkness, filled with bright specular lights randomly bouncing off of every surface and person.  This even was no exception.

1/20, f/2.5, ISO 800 - no flash

1/80, f/2.5, ISO 2500 - no flash
These first couple of shots were taken without flash, to give you an idea of what the ambient levels were and the shooting conditions.  For those interested, the EM1, while a tad slower to focus than normal, nailed focus 99% of the time - I was very impressed.

I knew that shooting this way, even at higher ISO, would not give me what I was looking for and I'd have to break out a speed light.  I do not have an Olympus specific speed light, but do have plenty of Nikon, so I used the SB-600.  It is a little big for the EM1, but I use my fingers to support the weight of the speed light.

This next shot was taken using the flash in manual mode at around 1/16th power and shot directly at the dance floor.

1/200, f/4, ISO 800 - Flash at 1/16th power
Well, they are well illuminated, but we have lost all ambient lighting.  Still not what I am looking to provide to my client.

Next, we bounced the light off the ceiling, which required the SB-600 to be powered to around 1/4 power.  There were some pretty tall ceilings.

1/200, f/2.8, ISO 1250 - flash at 1/8 power
As you can see, the quality of light is getting better, but still not enough give us the mix of ambient light and motion stopping power.

As you might have noticed, the shutter speed on these images were running around 1/200th.

What happens if we "drag the shutter"?  Dragging the shutter is a term used when you purposefully leave the shutter open for a longer duration and freeze the action of the moving subjects with the flash pulse.

1/15, f/2.8, ISO 1250 - flash at 1/8 power bounced off ceiling
In this case, we were running around 1/15-1/30 of a second and we start to get some good shots, that mix the ambient light along with the flash pulse to give us a better feeling and mood of the event that night.

Here are some more examples:

1/15, f/2.8, ISO 1250, flash at 1/8 bounced off ceiling
In the end, the take away is that you need to experiment and find that technique that will give you what you are looking for.  In this case, an old favorite, dragging the shutter, gave some interesting flavor and set a mood that expressed the feeling of the event.

For those interested in my main presence there - here are some of the portraits!


Lighting setup was pretty simple, main light to camera left(AB400) at 1/8 power, secondary light(AB400) to camera right at 1/16 power.  Both through umbrella boxes.

Nikon Df with Nikkor 50/1.8D at 1/200, ISO 200, f/4
Processed in Lightroom 5.7 using Nik Analog Efex(Bokeh) and Nik Silver Efex(custom B&W - base Panatomic 25 with a bit of Film Noir 3 type settings).

We wanted a quick in and out process so that the families could have as much time having fun as possible.

Monday, December 15, 2014

If You See The Shot, Take The Shot - Now!

One of the things that I learned later in my photography career is that whenever you see an opportunity to take a shot, you need to do it then. How many times have you gone past something on the way to another thing and said to yourself, "I have to come back to shoot that!", only to never come back or worse, you go back and the lighting, scenery or your access to the location is no longer the same. There were many times where this very thing happened to me and it is one of the strongest reasons I always have a camera with me at all times. I'm not super happy with the quality or controls of camera phones, so at a minimum, I always have a proper camera with me - even if it only be something like a fixed lens compact (X100, Ricoh GR type thing), or even a small zoom type camera(Panasonic LX100 or Fuji X10 series). You never know what you might stumble across running to the market for a quick pickup of milk or bread, running down to the book store in a part of town you don't always get to or you happen to see something you don't normally see on your way home/to work. I have a standing agreement with my wife that if we are ever driving anywhere and I see something that I want to stop and photograph, that it is a done deal. PS - it's great to have a partner who is supportive of your impulses and sometimes whacked out creative thoughts/ideas. This image I captured on the way to work. I was sitting at a traffic light and in front of me was a utility truck with 2 muddy hand prints on the back doors. No camera and this great opportunity is lost forever.
I love old, abandoned buildings. Don't know why, but they scream to me to be photographed. I stumbled across this old feed mill as I was driving home from some shopping. I recently went back to check this place out again and found that vandals/thieves had gone in and stole a bunch of copper piping/wires and smashed windows. The building is now all boarded up and has lost that intimate quality you see in the image below.

This portrait of a man and his dog I took at a local park. One of a kind and I doubt that I would have ever seen this man again. The park this was taken in is about 30 minutes from my home and I do not go there very often.

Cabrillo National Cemetery in San Diego California. I had limited time at this location and the way that the lighting and everything fell into place was not guaranteed to happen again while I was there.

As a parting thought, I implore you to never let an opportunity to pass you by and have regret that you could have captured a great image, but didn't. You need not spend a ton of money on a camera, pick up something used and capable. Hell, I used my Nikon D50 up until last year. Small DSLR body, throw a fast 50 on it for a few hundred bucks or get a used early gen m43 or Fuji X camera. Doesn't matter what you get, but get something that you can keep with you and deploy into action.

Saturday, December 13, 2014

Bringing Out The Diana f+ Instant


My wife's family has a lot of traditions, one of which is the annual Christmas Tree Day. On this occasion, we go out in search of that iconic item for the holiday season - the fresh cut Christmas tree!!
Being the photographer that I am, a camera comes with me!! :D
This year, I decided to change it up a little bit and not only document the occasion with my digital mirrorless kit(which my wife affectionately calls my gimp loadout*) but also bring the Diana f+ Instant with me as well.
For sure there were quite a few images taken with the digital cameras, but i thought that I would share some of the Diana images.
The Diana f+ instant back uses the Fuji Instax mini instant film. One of the frustrations with the Diana is that the viewfinder is not wildly accurate, so sometimes you get a framing that is not exactly what you envisioned. The best way to combat that frustration? Use the camera more! Like anything else, get familiar with and learn your gear in order to use it to its fullest potential. I do not use it enough to be 100% accurate.
This is one of those inaccurate framed shots.  I thought there would be more to the right side of the image then there was.
The other thing I learned about the Diana and its fabulous plastic lenses - flare and low contrast when pointing into a light source. In this case - the sun. There are 2 images here that got blasted because I was shooting toward the sun.
Lastly, in order to share these with you, I scanned these using an old Epson all in one device. The printer stopped being useful years ago, but the scanner is still kicking and going strong. Imported into light room and they are treated just like any other digital asset.

Please forgive the dirty scans, my scanner is in need of a good cleaning. LOL.

This is one that I accidentally over exposed.  They were in the shade, so I put the camera in "partly cloudy" mode.  I should have used the meter on my camera to verify.
*gimp loadout is a term that spawned itself when I needed to find a quality camera kit to work around the fact that my arm surgery from early November 2014/recovery process did not allow me to (a) hold a camera/lens of any appreciable weight and (b) the brace they had me in did not allow me to hold a camera in such a fashion that I can utilize the viewfinder. Anyone who is familiar with the Call of Duty console/PC games will understand the "loadout" reference. If not, it is the unit of armaments and skill sets that your character deploys into the imaginary battlefield in the game.

Saturday, February 8, 2014

Vintage Camera Product Shoot

Mamiya C33 TLR Medium Format Film Camera
Ah, yes...the product shot.  Generally when you here "product photography" you think of all those online catalogs or books you get in the mail.  Perfectly lit items, shown in all their glory.  Which is great, and they should be as we want our clients products to be shown in their splendor and glory.

Kodak Signet 35 Rangefinder - 35mm Film Camera
Creative Process:
For this shoot, we decided to try something a little different.  Using something we first heard from Joe McNally, "don't light everything" and the old adage that sometimes less is more.  Only one light is employed for these images.  We thought this would be an interesting way to shoot these vintage cameras to show their character.

The way the light is positioned allows us to show the textures of the materials the cameras are made of and the macro lens allowed us to get up close and personal with the details of the cameras.

We also thought it an interesting idea to shoot these cameras, some of which date back to 1931 with the newest digital SLR that Nikon makes right now, the Nikon Df.

Yashica Lynx 5000E Rangefinder 35mm Film Camera

Yahsica Lynx 5000E Meter Switch

Location:
Home Studio

Gear:
Nikon Df
Tamron 90mm f/2.8 Macro
Nikon SB-26 Speed Light
1/8" Grid
White Reflectors x 2
Light Stand
C-Stand With Boom Arm
Justin Clamp
Umbrella Adapter
Radio Popper JrX

Voigtlander Brilliant TLR Medium Format Film Camera

Voigtlander Brillaint Lens CloseUp
EXIF Info:
1/200th, ISO 100, f/8-f/16
Speedlight at 1/16th power

Graflex Speed Graphic Medium Format Film Camera Lens CloseUp

Mamiya C33 Lens CloseUp with Shutter and Aperture Controls
Lighting Setup:
One light on the boom arm of the C-stand in front and above the subjects. 
The reflectors are used as the background and surface - using the white side of the reflectors.


Post Processing:
Very minimal.  We shot the images with the standard picture control.  So, we used Lightroom to add some contrast and clarity.

Monday, November 11, 2013

How I Got TheShot #37 - Chamberlain College of Nursing Induction Shoot

Chamberlain College of Nursing has an annual induction ceremony that we have been invited to for capturing images of the night as well as getting portraits of the inductees into the Sigma Theta Tau society.

We wanted to run you through the night and give you some insight on how we got these shots.


Creative Process:
We had 2 parts to this job.  The first was to get some grab shots of the groups and then get individual portraits of all the inductees.  We ran this one pretty straight forward.


Location:
We were located inside a ballroom style area with very low ambient lighting levels.
Luckily, the walls and ceiling were white, so that helped us out a lot when were getting the grab shots during the event.  It also helped us out for the portraits as well.

Gear:
Nikon D700
Nikon 28-85mm f/3.5-4.5
Alien Bee B400
Nikon SB-26
Nikon SB-600
Umbrella Box
Radio Popper JrX Studio transmitter/receiver
Light stand
White Reflector


EXIF Info:
Shot in manual mode
Camera quality setting - JPG fine
exposure: 1/250, f/5.6, ISO 200(portraits), ISO 800-1600, f/3.5 to f/4.5, various shutter speeds(walk around)

(portraits)
Alien Bee power 1/4
SB-26 Power 1/8 power
(walk around)
SB-600 CLS -1EV

Lighting Setup:
For the walk around images, we used the Nikon SB-600.   I mentioned earlier about the walls and ceilings. We did not use straight flash, instead, we used bounce flash.  Either off the ceiling or we angled the flash head behind us and used the rear wall as a large light source.
In these situations, the room is too large to light the whole thing so you light what you can and let the rest of the ambient fall where it may.

Bounced the SB-600 off the wall behind me and into the forefront.  The rest of the room we "drag the shutter" and let it pull in the ambient.
For the portraits, we setup our lighting to stage left.  We had the AB400 in an umbrella box to the right of the subjects and at your standard 45 degree angle.  When we did the test shots, we were liking the light on the face, but we were not liking the dark shadows under the models chin.  We used a light filling technique where we place a round, white reflector on the floor and shot the SB-26 into it.


We had 36 portraits to get in a quick few minutes.  So we did not want to do anything too complicated   These portraits were done while the induction was going, so we did not want to have anything too disruptive.

Post Processing:
We did our standard portrait retouching using onOne Software's Perfect Portrait 8 beta.  We did a little blemish control and popped the eyes and teeth.  Nothing more.
We then did some basic contrast, sharpness, color boosting and then threw in a vignette to make the subjects stand out.

Monday, April 29, 2013

How I Got The Shot #36 - Large Group Family Portraits


Individual portraits and couples portraits are one thing, but what do you do when you run into a large group?  When I was originally called to do this photo shoot, I was told 15 people, and I planned accordingly.  What I should have done was planned accordingly and then some!!  What I thought was 15, really ended up being close to 30!    The only thing that I had to get creative one was the background.  The 10x20 black backdrop was just not enough to encompass the entire group.   Keep reading to see how we handled this shoot and covered the background issues.


Creative Process:
The client had a once in a lifetime chance - three full generations of family from all over the United States would be in town for one weekend only.  It may not happen again, we needed to make this happen.
She wanted the whole group as well as individual shots of each of the families.

One helpful reminder - have an assistant or two to help with setup, tear down and "client control".  During the shoot, you need to be engaging the client, but there are times you'll be making gear tweaks or solving technical issues.  The assistant can be organizing the group to be photographed and staging the ones after that.  Invaluable, even if you have to pay for an assistant - I highly recommend it.


Location:
The original shoot location was supposed to be an outdoor park.  However, the Ohio weather can be unpredictable, and a a nice cool, spring day we did not get.   It was cooler than it should be this time of the spring.   The client had an alternative - a gymnasium.
This presents its own obstacles as you don't have a ceiling to bounce off, and generally the color of the ambient lights can be less than desirable.

Obstacle 1 - high ceiling.
We handled this by using umbrella boxes, 2 to be precise.  We angled one from each side to do our best  to get a good coverage of all the large groups.

Obstacle 2 - color casts of the ambient lights.
3 words for you - kill the ambient.   We made our shutter speed 1/250th and that was enough to kill the ambient light of the gym.  This way, we only have the color of the strobes we were using to contend with.

Obstacle 3 - power.
I mean power to our studio lights.  There were outlets and we brought plenty of extension cords.  However, if there is no power to the outlets - no beautiful pops from the Alien Bees!  Alway be prepared.  We brought our Vagabond Mini Lithium power supply with us.

Obstacle 4 - too small a backdrop.
We will cover this more in detail in the post processing section, but a little hint for you - Photoshop CS6 and a little third party plugin power!  :)

Gear:
Nikon D700
Nikon 28-85mm f/3.5-4.5
Alien Bee B400 x 2
Umbrella Box x 2
Radio Popper JrX Studio transmitter/receiver
Background stand
Light stand x 2
10 x 20 black backdrop

EXIF Info:
Shot in manual mode
Camera quality setting - JPG fine
exposure: 1/250, f/8, ISO 200
Strobe power between 1/4 and 1/2 power

Lighting Setup:
As stated earlier, we used the umbrella boxes and used this basic setup seen below.  Time was a factor so we needed something versatile for both the large and small groups we would be working with.
I skimmed the back edges of the umbrellas across the back of the groups and let the rest of the light overlap through the middle of the group.

Post Processing:
We strive to get the best possible image in the camera at the time of the shoot.  This keeps out need for post processing down.

We used onOne Software Portrait 2.0 software to get rid of the fly away hairs, sharpen the eyes and do some basic touch ups.

We handled the backdrop shortcoming by using another plugin from Topaz Labs called Remask 3.  This tool makes doing cut outs a relatively simple task, even for the hardest of subjects.   Basically, you make in red what you don't want, green what you do, and blue marks what you want the program to determine.  You do a little cleanup and you go from an image like this:


To this:


After the parts of the image you do not want are removed, you placed a black color layer behind the portrait image.  We then used the burn tool set to shadows at 65% to blend in the backdrop to the other portions of the black layer.  Some cloning was also needed for the green flooring to extend it out.