Here is a little quick tip for you this holiday season. The bonus gift is that you'll get something that is useful all year long as well.
If you've ever shot with a Nikon camera before, you'll know that it is very easy to blow out the red channel in your images. What that means is that the reds can tend to be over saturated and over luminated. It gives you something like you'll see below:

Lovely image of this little boy telling Santa what he wants for Christmas, but you'll notice that Santa's suit is a little weird looking in the red parts. Today, we are going to look at a quick way to rectify this in either Lightroom or Adobe Camera RAW. Other post processing software may also be able to adapt to this process as well.
Shoot in RAW if you can. You'll have more latitude in processing. If not, you may still be able to get this to work quite well with your JPG files.
Your RAW image should look something like this when you first begin:

The colors are very muted and the image is low contrast. So the first thing you'll want to do is start bumping up the contrast, exposure if necessary (hopefully you got the flashes at the proper power to make this a non-issue), vibrance, sharpening, etc.
Problem is, if you use the TONE controls, they work on an image in an overall way, affecting everything. So in order to get the boys shirt/jeans and the background to a proper level, you end up having the blown out reds like you see in the first image we posted. So, here is where the fix comes in.
Scroll down to the section HSL/Color/B&W. Select the word Color. You'll see a box like the one below.

After I got all the other colors the way I wanted them, I can now use this to fix Santa's suit color.
Each one the colored boxes isolates the color properties in the image. It no longer will affect every color in the image. So, I clicked the far left box, which is the Red box. I bumped the Saturation down to -10 and the Luminance down to -40. The real game changer here is Luminance. Once you start sliding that down, you'll see the reds immediately start to lose that blown out look, the detail will return.
That gives us our finished image, which I've provided below:

There are other methods of dealing with this, but I found this one to be one of the quicker ways to do it.
My setup was 2 strobes (Alien Bee B400) one to camera right and above the subjects, and a fill/hair light to camera left parallel the where Santa was sitting. Power on main light was 1/4, fill light was 1/16 power.
Nikon D700 and Nikkor 24-70/2.8G lens was used. Settings were 1/60 @ f/5.6 ISO 200 WB set to flash in camera.
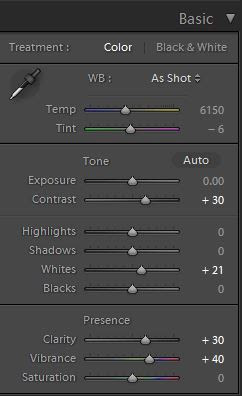
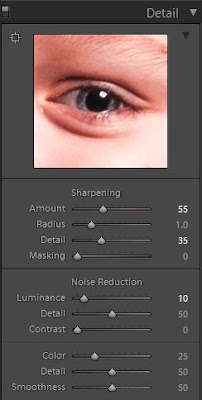
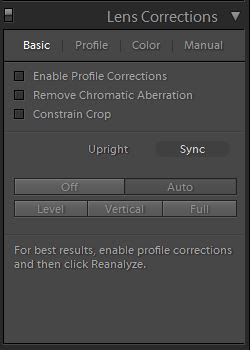
Here are the other settings I used in Lightroom.


If you've ever shot with a Nikon camera before, you'll know that it is very easy to blow out the red channel in your images. What that means is that the reds can tend to be over saturated and over luminated. It gives you something like you'll see below:

Lovely image of this little boy telling Santa what he wants for Christmas, but you'll notice that Santa's suit is a little weird looking in the red parts. Today, we are going to look at a quick way to rectify this in either Lightroom or Adobe Camera RAW. Other post processing software may also be able to adapt to this process as well.
Shoot in RAW if you can. You'll have more latitude in processing. If not, you may still be able to get this to work quite well with your JPG files.
Your RAW image should look something like this when you first begin:

The colors are very muted and the image is low contrast. So the first thing you'll want to do is start bumping up the contrast, exposure if necessary (hopefully you got the flashes at the proper power to make this a non-issue), vibrance, sharpening, etc.
Problem is, if you use the TONE controls, they work on an image in an overall way, affecting everything. So in order to get the boys shirt/jeans and the background to a proper level, you end up having the blown out reds like you see in the first image we posted. So, here is where the fix comes in.
Scroll down to the section HSL/Color/B&W. Select the word Color. You'll see a box like the one below.

After I got all the other colors the way I wanted them, I can now use this to fix Santa's suit color.
Each one the colored boxes isolates the color properties in the image. It no longer will affect every color in the image. So, I clicked the far left box, which is the Red box. I bumped the Saturation down to -10 and the Luminance down to -40. The real game changer here is Luminance. Once you start sliding that down, you'll see the reds immediately start to lose that blown out look, the detail will return.
That gives us our finished image, which I've provided below:

There are other methods of dealing with this, but I found this one to be one of the quicker ways to do it.
My setup was 2 strobes (Alien Bee B400) one to camera right and above the subjects, and a fill/hair light to camera left parallel the where Santa was sitting. Power on main light was 1/4, fill light was 1/16 power.
Nikon D700 and Nikkor 24-70/2.8G lens was used. Settings were 1/60 @ f/5.6 ISO 200 WB set to flash in camera.
Here are the other settings I used in Lightroom.
