 |
| image © musictribe.com/Behringer |
With the relatively recent releases of the Loupedeck devices, my interest was piqued to see if something like this would indeed enhance the develop module workflow in Lightroom.
The original Loupedeck and software comes in at around $179, while the newer Loupedeck + device and software is $250.
What does this device do, exactly? Well, it is an alternative control that allows Lightroom modifications and controls through dials and switches instead of using a mouse and slider controls.
I was a bit skeptical at first, so as I normally do - I hit research mode. I watched YouTube videos of people using and setting up the Loupedeck devices. I could definitely see the value in it. What I could also see was related videos about Loupedeck alternatives.
OK, I'm intrigued. Basically for $50, you can get a similar device with free software to do something similar. Digging deeper into that side of the research brought us to the Behringer X-Touch Mini USB MIDI controller board and the MIDI2LR open source software.
For a $50 investment, I figured it was worth the gamble.
An Amazon Prime order and 2 days later, the X-Touch Mini is delivered.
Installation:
All the drivers for the X-Touch Mini are built into the device, so plugging it into my Windows 10 PC, had it connected, recognized and ready for use within seconds. I even went and checked the Behringer website to see if there were any newer drivers. No, on that.Next I went to the GITHUB site for MIDI2LR and downloaded it. I did some research on what it would take to get this up and running. A lot of the instructions out there seem to be a lot older than the version of software that is out there as of now. There is a proper installer and all I needed to do was download the EXE file and run it. MIDI2LR installed the plugins to the proper directories. I then just went into Lightroom and made sure that it was in the plug-in manager.
Sure enough, it was there. There were also some instructions that showed the need to start and stop the MIDI2LR server. This automatically starts and stops when I run Lightroom, so no need to do anything else.
 |
| image © musictribe.com/Behringer Full Board |
Setup:
Setup for the board is plug and play, no need to do anything else than have it plugged into the USB port.MIDI2LR will need some initial setup. You can either find a profile XML file on the internet to start with or setup the buttons on the X-Touch yourself. I chose to setup the buttons myself.
With the MIDI2LR interface running, the board plugged in...press a button on the board and it is highlighted in the panel. From there, you click the button and select what you want to assign to that button or dial.
Here is how I setup my board initially:
 |
| image © musictribe.com/Behringer Row Of Dials |
DIALS
(all dials can be clicked down as well, and those are setup to do a RESET to that dials function)Bank A
#1 - Exposure
#2 - Contrast
#3 - Highlight
#4 - Shadow
#5 - White
#6 - Black
#7 - Vibrance
#8 - Clarity
Bank B
#1 - Sharpening Amount
#2 - Sharpening Detail
#3 - Sharpening Masking
#4 - Luminance Noise Reduction
#5 - Color Noise Reduction
#6 - Dehaze
#7 - Vignette
#8 - WB/Temperature
 |
| image © musictribe.com/Behringer Button Row 1 and 2 |
BUTTONS
Row 1/Bank A (these are my custom built presets)#1 - Preset 1 = APSC/FF Basic
#2 - Preset 2 = APSC/FF Hi ISO
#3 - Preset 3 = Nikon RAW
#4 - Preset 4 = Olympus Basic
#5 - Preset 5 = Olympus Hi ISO
#6 - Preset 6 = Olympus RAW
#7 - Preset 7 = CellPhone
#8 - Preset 8 = B&W Finisher
Row 2/Bank A
#1 - before/after toggle (MC)
#2 - copy develop settings
#3 - Previous Image (<<)
#4 - Next Image (>>)
#5 - Before/After (loop)
#6 - Auto Transform ([])
#7 - Show Crop (>)
#8 - Add to quick collection (record symbol)
#1 - currently unmapped
#2 - currently unmapped
#3 - currently unmapped
#4 - currently unmapped
#5 - currently unmapped
#6 - currently unmapped
#7 - currently unmapped
#8 - currently unmapped
Row 2/Bank B
#1 - create virtual copy (MC)
#2 - paste develop settings
#3 - 3 Stars (<<)
#4 - 5 Stars (>>)
#5 - currently unmapped
#6 - currently unmapped
#7 - Export (>)
#8 - currently unmapped
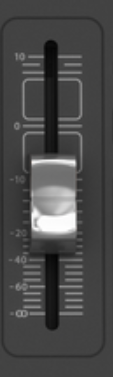 |
| image © musictribe.com/Behringer non-powered fader |
Fader dial is not used because it is not motorized. The other dials and buttons are capable of taking on the value they are assigned to in Lightroom. You'll notice this when you switch images. The lights around the dials will change to match the value setting on the commands they are mapped.
 |
| image © musictribe.com/Behringer Layer A/B Buttons |
The layer buttons found on the far right are the selections between the 2 different banks.
Once you have the buttons setup, you can save it as a profile that is loaded every time the MIDI2LR program is started.
The board is completely USB powered, so only one cord is needed for connections. I've seen some ingenious YouTube videos where people have connected a small power bank and bluetooth device to it, allowing for it to be used sans wire.
 |
| image © musictribe.com/Behringer side view showing USB port |
I'll probably change around some of the button assignments in the future to better suite my workflow, putting the most used buttons and dials on layer A, then using the backup functions on layer B.
Here is my board, labeled using the Brother P-Touch PT-H110 label maker:

That brings me to the benefit I see of using the Behringer over the Loupedeck. While it is nice to have the buttons pre-labeled on the Loupedeck device - they are pretty much stuck there. I've heard you can re-program them with the provided program. I'd much rather have blank buttons like on the Behringer and use a label maker.
The downside is that the MIDI2LR software is open source and the developer could stop supporting it at any time. To a lesser degree, the same thing could hold true for Loupedeck, if the product doesn't take off the company could abandon it.
It just seemed to me that the $50 investment at this time was a better choice.
So, we've talked a lot setup and hypothetical. What about this thing in action?
So far, I've only used it to edit and post process a handful of photo shoots. I did not have my label maker right away and during that time, I was not always hitting the right dial or button every time, but I did not have any time lost versus just using the keyboard and mouse.
With that being said, once I use it for a bit longer, I definitely see me getting through a set of images faster. I really only need to look at the histogram on the right side. The dials go right to it and work excellent.
One small change I've done that is different from my old workflow is turn on the visual clipping indicator in the histogram. This makes clipped blacks glow in blue and clipped highlights glow in red. This makes using the black/white/highlight/shadow adjustments quicker.
All I know right now is that this is fun to use, easy to setup and inexpensive enough to have taken a chance on. It will decrease my time in front of the computer when doing culling and post processing tasks. That alone is going to recoup the $50 spent. I'm even going to donate some money to the developer for the effort. It is well worth it!
No comments:
Post a Comment
Note: Only a member of this blog may post a comment.