Saturday, December 19, 2015

Dealing With Those Nikon Reds - A Holiday Special

Here is a little quick tip for you this holiday season.   The bonus gift is that you'll get something that is useful all year long as well.

If you've ever shot with a Nikon camera before, you'll know that it is very easy to blow out the red channel in your images.  What that means is that the reds can tend to be over saturated and over luminated.  It gives you something like you'll see below:


Lovely image of this little boy telling Santa what he wants for Christmas, but you'll notice that Santa's suit is a little weird looking in the red parts.  Today, we are going to look at a quick way to rectify this in either Lightroom or Adobe Camera RAW.  Other post processing software may also be able to adapt to this process as well.

Shoot in RAW if you can.  You'll have more latitude in processing.  If not, you may still be able to get this to work quite well with your JPG files.

Your RAW image should look something like this when you first begin:


The colors are very muted and the image is low contrast.  So the first thing you'll want to do is start bumping up the contrast, exposure if necessary (hopefully you got the flashes at the proper power to make this a non-issue), vibrance, sharpening, etc.

Problem is, if you use the TONE controls, they work on an image in an overall way, affecting everything.  So in order to get the boys shirt/jeans and the background to a proper level, you end up having the blown out reds like you see in the first image we posted.  So, here is where the fix comes in.

Scroll down to the section HSL/Color/B&W.  Select the word Color.  You'll see a box like the one below.


After I got all the other colors the way I wanted them, I can now use this to fix Santa's suit color.

Each one the colored boxes isolates the color properties in the image.  It no longer will affect every color in the image.  So, I clicked the far left box, which is the Red box.  I bumped the Saturation down to -10 and the Luminance down to -40.  The real game changer here is Luminance.  Once you start sliding that down, you'll see the reds immediately start to lose that blown out look, the detail will return.

That gives us our finished image, which I've provided below:


There are other methods of dealing with this, but I found this one to be one of the quicker ways to do it.

My setup was 2 strobes (Alien Bee B400) one to camera right and above the subjects, and a fill/hair light to camera left parallel the where Santa was sitting.  Power on main light was 1/4, fill light was 1/16 power.

Nikon D700 and Nikkor 24-70/2.8G lens was used.  Settings were 1/60 @ f/5.6 ISO 200 WB set to flash in camera.

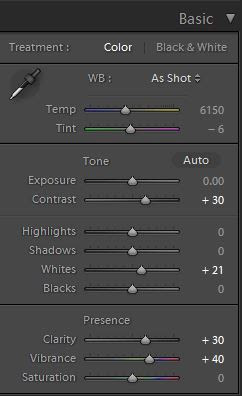
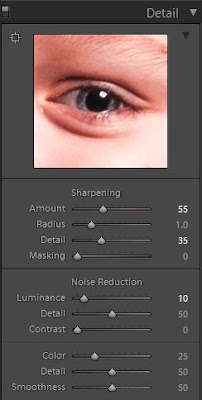
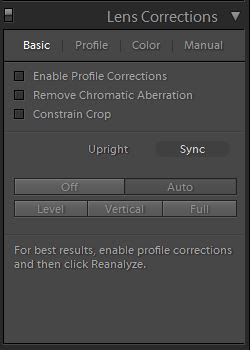
Here are the other settings I used in Lightroom.


Tuesday, December 1, 2015

How I Got The Shot #39 - Dragging the Shutter at the Mother/Son Halloween Dance

This is a companion piece to the previous, How I Got The Shot #38.


In that article, we covered the technique of dragging the shutter and using flash.  If you are unfamiliar with this concept, you might want to read that first, then come back here to follow up on the new stuff.

So what is the new stuff?  Well, we added a small "twist" to the formula we used in the previous dance.

We still are going to use slow shutter speeds in conjunction with flash, but the "twist" is actually literal.


These images above are your "standard" shots.  Fill flash used, as you would have expected.

Since we had been in this venue before, we already knew how to get to a place like in article #38.  However, this felt like it needed something additional.  Being it is a Halloween dance, we wanted to give it a different look.

The shutter speed was lengthened more from the previous times, usually running around 1/5 to 1/15 of a second.  What we did was setup the camera in manual and shot ISO 800, 1/5-1/15s, f/4.  The SB-600 was used in manual and power was set to 1/4 or 1/8 power depending on where were were in the room.  The flash was bounced almost directly upward, and no more than 45 degrees.


You compose your shot, trip the shutter and then immediately after, you twist the camera 90 degrees on it's axis.  This makes the ambient lighting streak in a circular motion around the subject.  The flash freezes the subject, so they are relatively sharp in comparison.

This is the result!  The 2 images directly above as well as the opening image.

Gear used:
Nikon D300
Nikon 24mm f/2.8
Nikon SB-600

And as with all the events like this, there are some portraits taken.


Gear used:
Nikon D700
Nikon 28-85/3.5-4.5
Radio Popper JRx
AB400 x 2
Flash1 was to camera left at 1/4 power (key)
Flash2 was to camera right at 1/16 power (fill)
Background was not illuminated on its own

Camera settings 1/250, ISO 200, f/5.6

Tuesday, September 8, 2015

Making The Best Of Some Short Downtime

Personal projects are very important.   Sometimes they can be pre-planned, other times they just appear when you least expect it.  Personal projects allow you to experiment in ways that you wouldn't normally.  They also give you full control over what you are doing.  A good refreshing for mind, body and soul.

On a recent trip to Dayton, OH there was some unexpected downtime between events, so the wife and I were able to take a bit of a rest.  We needed the break, weather being high humidity and in the mid to high 90F degrees.  Back at the house we were renting, I found some "target rich" still life.

Gear Used:
Olympus OMD EM5 Mk II
Olympus 25/1.8 prime lens
Ambient Light for "Zeke"
Olympus supplied external flash with the EM5 Mk II for some of the walnut shots.

Right inside the front door, we were greeted by "Zeke", the name my wife gave him.  :D

The property owners came up with creative ways to monitor the house, using "Zeke" to hold the camera as well as the microphone.


After Zeke gave me very little outside of his A/V look, I started wandering elsewhere.  This time in search of light.

Found a nice, big window with the setting sun illuminating the formal dining room.  I liked the size and quality of the light - now I just needed to find a suitable subject.   There were some flowers there, but I was not feeling them.  Wandering through the house, I found a bowl of walnuts and almonds.


Took an overall shot of the bowl.  Trying to use some things I'm learning about video production.   Here I am looking to set the scene with a wide shot.


Then we come in with a closeup.  A single subject, standing on it's own.  Side lighting.


Bringing in some extra subjects - and kicked the EM5 Mk II into hi res mode, which gives us a bit more tonal range as well as a 40mp jpg to work with.


So, now, I'm pulling in some extra shapes, with the almonds, and looking at a different angle.  Looks like I'm trying to create a nut Stonehenge or something.


Didn't want to continue on with adding more walnuts/almonds, so started looking at incorporating the nut cracker and picks.


Almost looks like a masonic symbol of some kind.


So what did we learn here in all this?

1)  If you really want to make an image, you can.  Don't let the location or circumstances inhibit your creativity.
2)  Doing this kind of project, regardless of how small, keeps the creative thoughts flowing.
3)  With minimal gear, you can create some great images just by working with the light you have.
4)  Use times like this to try and create a feeling or evoke emotion from something that doesn't usually get associated with it.

Technical growth goes only so far, and at the end of the day, the technical stuff is really all science.  The biggest place for growth in your personal photo journey is going to be in finding creative ways of expressing things that people see everyday.  It is also one of the most difficult.  That journey is often a very personal one, and means different things to different people.

That is also what makes it great, fun, and rewarding.

Monday, August 31, 2015

"Rules" To Shooting?

Rules in photography are nice, I guess.  They can help rein things in and keep them on target.  Given boundaries, you often get a relatively structured, predictable result.

Nothing wrong with that.  If you are doing work for people, they are often wanting something they know, have seen before or is predictable.  There are those that love to define things, and definitions are good for when you are trying to describe or explain a concept to someone.  We as humans love things in orderly fashion and like to know that things fit in somewhere.


I'd like to concentrate on what most people classify as "street" photography.  Can we really classify what the definition of street photography might be?

While this can make things quite easy as a conversation piece, they sometimes can give people the impression that only those things that fit into those strict definitions are "street".  What makes this even more of a complex issue is that no one can agree on what the definition of street photography might be.  Not only can we not agree on what the definition of street photography should be, there are those out there that try and use different terms for the same damn thing!  Rebranding and rebadging things for the blog clicks or trying to redefine something old as something new to get more followers.


I've seen that done many times in my IT career, where system development life cycle (SDLC) processes and internal process get renamed by consulting companies.  They sell the same thing with a different name and get big money for it.


My thoughts are this.  It is an age old practice for people to find photographers and their work that they like and try to emulate it.  They do their best to understand how to replicate a style.  This is good, it is a learning experience.  We should, though, once you have gotten sufficient skill in the one you are emulating, turn to finding ways of enhancing/improving on what you have learned.  It is the never ending journey of finding your own unique style.


Along with the emulation period, there are also all those rules out there that like composition rules, exposure rules.  If you've read one of my previous posts that deals with ways of improving your photography - I don't like "rules", I much prefer "guidelines".  Use the guidelines to help you, but they are not something that cannot be broken when the subject suits.  Just so you don't think that I'm being a hypocrite, I'm not saying we should rename rules to guidelines.  I'm saying to take the defined "rules" and use them as guidelines.  Throw them out when they do not work for what you are doing.  Don't confine yourself to that arbitrary box.


I say to hell with all those people that tell you that the best lens to shoot street photography are either a 35mm or 50mm lens/field of view.  Why, because HCB did it that way?  Who gives a hoot what they shot with, especially if that focal length doesn't suit your aesthetic or your vision for the final image you see.
There is no best camera, only the one that works for you.   There is no best lens, only the one that works for you.  Some people will be all about telling you that the best street camera is the smallest one that no one knows you are using, others will tell you that a DSLR is the best, or a Leica.  I think you get the point.  What one person considers a favorite, someone else might find it unusable.


I hear photographers all the time complaining that they are tired of seeing the same old shots in B&W and it's too contrasty...yet these are the same people that put these "rules" on what street photography should be.  Talk about sending out mixed signals!

If you want street photography, or any genre for that matter to expand to more/different/better than its current state, the rules or barriers must be expanded/broken down.


At the end of the day, you just need to make sure that you are shooting to the end game of what you are wanting.  Sometimes the gamble pays off, sometimes it doesn't....but you have to decide if you want to be an innovator or just someone who takes pictures.  Either way, have fun doing what you love.  Not everyone has to be an innovator, while others can't stand to be just another person in the crowd.